

Integration Walkthrough
Last updated: 2026-03-22
Purpose
This walkthrough shows how to build a real ECR integration against the Westpay Online API using the sandbox virtual terminal. Every step maps directly to what your production ECR system will need to implement.
By the end you will have completed a full payment cycle: credentials → terminal link → purchase request → status polling → approval.
Architecture Overview
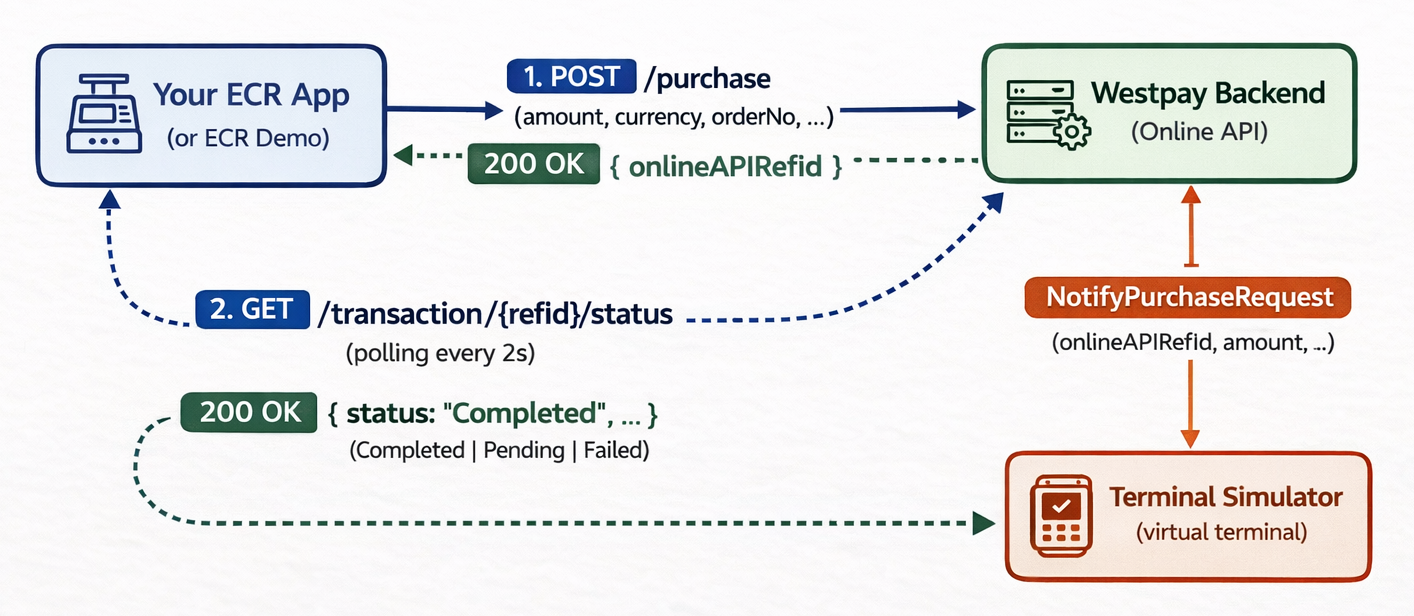
The backend acts as a broker: your ECR sends REST calls, and the backend forwards the transaction to whichever terminal (physical or virtual) is identified by the ConnectionId header in your request.
Step 1 — Authenticate
Every API request requires two headers:
httpOcp-Apim-Subscription-Key: <your-subscription-key>
Authorization: Bearer <your-merchant-token>
Obtain these from the Westpay Support Team. See Sandbox Overview for details.
In the ECR Simulator, enter these in Configure → Authorization and click Save & Continue.
Step 2 — Start the Terminal Simulator
- Switch to the Terminal Simulator tab
- Wait for the SignalR connection to establish (green Connected indicator in the header)
- Note the Connection ID shown in the toolbar — your ECR will use this in every request
The virtual terminal starts in an unlinked state and displays a 6-digit registration code.
textCurrent state:   Not Linked
Registration:    483291   (example — yours will differ)
Connection ID:   a1b2c3d4-e5f6-7890-abcd-ef1234567890
Step 3 — Link the Terminal
Before accepting payments, the terminal must be linked to your merchant account.
Using the ECR Simulator (Simulation Mode ON)
- Switch to ECR Simulator → click Configure
- On the Terminal tab, Simulation Mode is ON by default
- Verify:
- Connection ID is auto-filled
- Terminal ID shows
80000800 - Registration Code shows the code from the virtual terminal display
- Terminal Linking toggle is set to Link Terminal
- Click Link Terminal
What Happens Behind the Scenes
The ECR Simulator sends:
httpPOST /in-store/api/v1/terminal/link
Ocp-Apim-Subscription-Key: <key>
Authorization: Bearer <token>
ConnectionId: a1b2c3d4-e5f6-7890-abcd-ef1234567890
Content-Type: application/json

{
  "terminalId": "80000800",
  "registrationCode": "483291"
}
The backend validates the registration code against the virtual terminal's current code. If they match:
- The terminal transitions to Linked state
- The virtual terminal display shows a confirmation screen
- A success notification appears in the ECR Simulator
Implementing Link in Your ECR
javascriptasync function linkTerminal(terminalId, registrationCode, connectionId) {
  const response = await fetch(
    'https://qa-api.westpay.se/in-store/api/v1/terminal/link',
    {
      method: 'POST',
      headers: {
        'Content-Type': 'application/json',
        'Ocp-Apim-Subscription-Key': SUBSCRIPTION_KEY,
        'Authorization': `Bearer ${MERCHANT_TOKEN}`,
        'ConnectionId': connectionId,
      },
      body: JSON.stringify({ terminalId, registrationCode }),
    }
  );
  return response;
}
Step 4 — Send a Purchase Request
With the terminal linked, build an order and send a payment request.
Using the ECR Simulator
- Select products from the grid to build an order
- The running total updates in the Order Panel
- Click Pay
<amount>kr
What Happens Behind the Scenes
httpPOST /in-store/api/v1/purchase
Ocp-Apim-Subscription-Key: <key>
Authorization: Bearer <token>
ConnectionId: a1b2c3d4-e5f6-7890-abcd-ef1234567890
Content-Type: application/json

{
  "amount": "45.00",
  "currencyCode": 752,
  "terminalId": "80000800",
  "paymentMethod": ""
}
Amount format: Send amount as a decimal string in
##.##format (e.g."45.00"). Currency code752is ISO 4217 for SEK.
A successful request returns HTTP 201 with:
json{
  "onlineAPIRefId": "ref-abc123"
}
Save this reference ID — you will use it to poll for the transaction result.
Implementing Purchase in Your ECR
javascriptasync function sendPurchase(terminalId, amountInKronor, connectionId) {
  const response = await fetch(
    'https://qa-api.westpay.se/in-store/api/v1/purchase',
    {
      method: 'POST',
      headers: {
        'Content-Type': 'application/json',
        'Ocp-Apim-Subscription-Key': SUBSCRIPTION_KEY,
        'Authorization': `Bearer ${MERCHANT_TOKEN}`,
        'ConnectionId': connectionId,
      },
      body: JSON.stringify({
        amount: amountInKronor.toFixed(2),
        currencyCode: 752,
        terminalId,
        paymentMethod: '',
      }),
    }
  );

  if (response.status === 201) {
    const { onlineAPIRefId } = await response.json();
    return onlineAPIRefId;
  }
  throw new Error(`Purchase failed: ${response.status}`);
}
Step 5 — Interact with the Virtual Terminal
After the purchase request is sent, the virtual terminal receives a NotifyPurchaseRequest event from the backend and transitions to the payment flow:
- Switch to the Terminal Simulator tab
- The terminal display shows the payment screen
- Use the on-screen buttons to step through PIN entry and confirmation
- Click the Approve action button to approve, or Decline to decline
In the ECR Simulator, the loading overlay stays visible ("Waiting for terminal…") until the terminal responds. Both tabs are live simultaneously — you can flip between them.
Step 6 — Poll for Transaction Status
While the terminal is processing, your ECR polls the status endpoint:
httpGET /in-store/api/v1/transaction/{onlineAPIRefId}/status
Ocp-Apim-Subscription-Key: <key>
Authorization: Bearer <token>
ConnectionId: a1b2c3d4-e5f6-7890-abcd-ef1234567890
Response:
json{
  "transactionStatus": 14
}
transactionStatus | Meaning |
|---|---|
14 | Pending — terminal is still processing |
0 | Approved — transaction complete |
| Any other value | Declined or failed |
Implementing Polling in Your ECR
javascriptasync function pollTransactionStatus(refId, connectionId) {
  const response = await fetch(
    `https://qa-api.westpay.se/in-store/api/v1/transaction/${refId}/status`,
    {
      method: 'GET',
      headers: {
        'Ocp-Apim-Subscription-Key': SUBSCRIPTION_KEY,
        'Authorization': `Bearer ${MERCHANT_TOKEN}`,
        'ConnectionId': connectionId,
      },
    }
  );
  const { transactionStatus } = await response.json();
  return transactionStatus;
}

async function waitForResult(refId, connectionId) {
  while (true) {
    const status = await pollTransactionStatus(refId, connectionId);
    if (status === 14) {
      await new Promise(resolve => setTimeout(resolve, 2000)); // wait 2s
      continue;
    }
    return status === 0 ? 'approved' : 'declined';
  }
}
Step 7 — Handle the Result
Once the terminal responds, the ECR Simulator shows:
- Payment Approved — the cart clears and the overlay dismisses after 2.5 seconds
- Payment Declined — the overlay shows a declined message and dismisses after 2.5 seconds
In your ECR implementation, handle both outcomes:
javascriptconst result = await waitForResult(refId, connectionId);

if (result === 'approved') {
  clearCart();
  printReceipt();   // optional — see Print Receipt API
  showSuccess('Payment approved');
} else {
  showError('Payment declined — please try another method');
}
Unlinking the Terminal
To unlink the terminal (e.g. at end of day or when re-assigning it):
- Open Configure → Terminal in the ECR Simulator
- The Terminal Linking toggle auto-switches to Unlink Terminal (simulator is linked)
- Click Unlink Terminal
httpPOST /in-store/api/v1/terminal/unlink
Content-Type: application/json
...headers...

{
  "terminalId": "80000800"
}
After unlinking, the virtual terminal generates a new registration code and returns to the unlinked screen.
Complete Integration Checklist
Use this checklist to verify your ECR implementation is production-ready:
- Subscription Key and Bearer Token are stored securely (not hardcoded)
- All requests include
Ocp-Apim-Subscription-Key,Authorization, andConnectionIdheaders - Amount is sent as a decimal string in
##.##format - Currency code is
752for SEK - Terminal is linked before sending payment requests
- Purchase response is checked for HTTP
201before extractingonlineAPIRefId - Status polling handles
transactionStatus: 14(pending) with a retry delay - Both approved (
0) and declined (other values) outcomes are handled - 400 validation errors are parsed from the
errorsobject in the response body - 401 / 403 responses trigger a credentials refresh or user notification
- Terminal unlink is called when the session ends
Common Issues
| Symptom | Likely Cause | Fix |
|---|---|---|
| Link fails with "invalid registration code" | Wrong or expired code | Refresh the code from the virtual terminal display |
Purchase fails with 400 Amount error | Amount not in ##.## format | Use amount.toFixed(2) |
Purchase fails with 102 | Terminal not linked | Link the terminal first |
Status always returns 14 | Virtual terminal waiting for interaction | Switch to Terminal Simulator tab and complete the payment flow |
| SignalR connection fails | Wrong Subscription Key | Check key in Configuration → Authorization |
| CORS error in browser console | Direct browser-to-API calls blocked | Use a server-side proxy or configure CORS on your API Management instance |